If you’ve ever looked at a rendering and thought, “Whoa, did that come straight out of a real estate dream?” chances are, you were witnessing the magic of post-processing. Welcome, architects, designers, and visualization pros! Today, we’re diving deep into Post-Processing Tips for Architectural Renderings that will take your images from “okay” to “oh wow.”
Whether you’re prepping a project for a client presentation, a design competition, or your Instagram feed (hey, we see you), these tips will help make your 3D renderings pop, sizzle, and communicate your vision clearly and compellingly.
Let’s break it down and level up your visualization game.
Why These Post-Processing Tips Matters in Architectural Visualization
The Gap Between Raw Renders and Client-Ready Images
We’ve all been there. You spend hours modeling, texturing, and lighting your project. You hit that render button and—meh. It’s good, but it’s not great. Post-processing bridges the gap between “raw” and “ready,” injecting life, atmosphere, and emotion into your visuals.
Saving Time vs. Re-rendering: Why Fixing in Post is Smart
Say it with me: Don’t re-render, retouch. Post-processing can save hours of rendering time. Need more contrast? Softer shadows? A different sky? Fix it in post. Done right, it saves you time, resources, and headaches.
10 Essential Post-Processing Tips for Architectural Renderings
Before we jump into each tip, it’s worth mentioning that for the examples in this section, we’ll be using Adobe Photoshop—a powerhouse tool in the post-processing world. However, these techniques are not exclusive to Photoshop. We’ll include a complete list of recommended tools later on in this article—so whatever your workflow, you’re covered.
1. Start with a Well-Exposed Base Render
Your post-processing journey begins before you even open Photoshop. And yes, this is one of the most overlooked tips for architectural renderings.
Think of your raw render as the foundation of a building. If it’s unstable—too bright, too dark, or lacking detail—it doesn’t matter how much styling you do on top. You’re setting yourself up for extra work and limitations later.
Pro Tip: Avoid rendering with pure blacks or whites. These values, once clipped, contain no recoverable data. That means if your highlights are burned out (255, 255, 255) or your shadows are crushed (0, 0, 0), no amount of editing will bring them back. It’s like trying to paint details onto a brick wall with invisible ink—frustrating and ultimately futile.
If your rendering engine allows it, export in 16-bit or 32-bit formats like EXR or TIFF. These formats preserve a greater dynamic range, making it easier to push and pull brightness, shadows, and midtones in post without breaking the image.
Architect’s Insight: Think of the base render like a site plan—it doesn’t need to be flashy, just clean, structured, and flexible. Save the glam for later when you’re adding the lighting mood, atmosphere, and storytelling.
2. Blend Render Elements with Photoshop Layer Modes
Instead of juggling passes in your rendering software, you can bring them into Photoshop and blend them like a pro. Just stack your AO, reflections, depth maps, or any element-specific render on top of your base render and experiment with blending modes.
-
Use Multiply to darken areas (great for AO or shadow passes).
-
Use Screen to brighten reflective or glowing details (hello, glass and water).
-
Tweak Opacity for subtlety and stack multiple passes for even more control.
Bonus tip: Group related passes into folders and add masks to control where they show up—like darkening only the underside of a balcony or brightening just the glass facade.
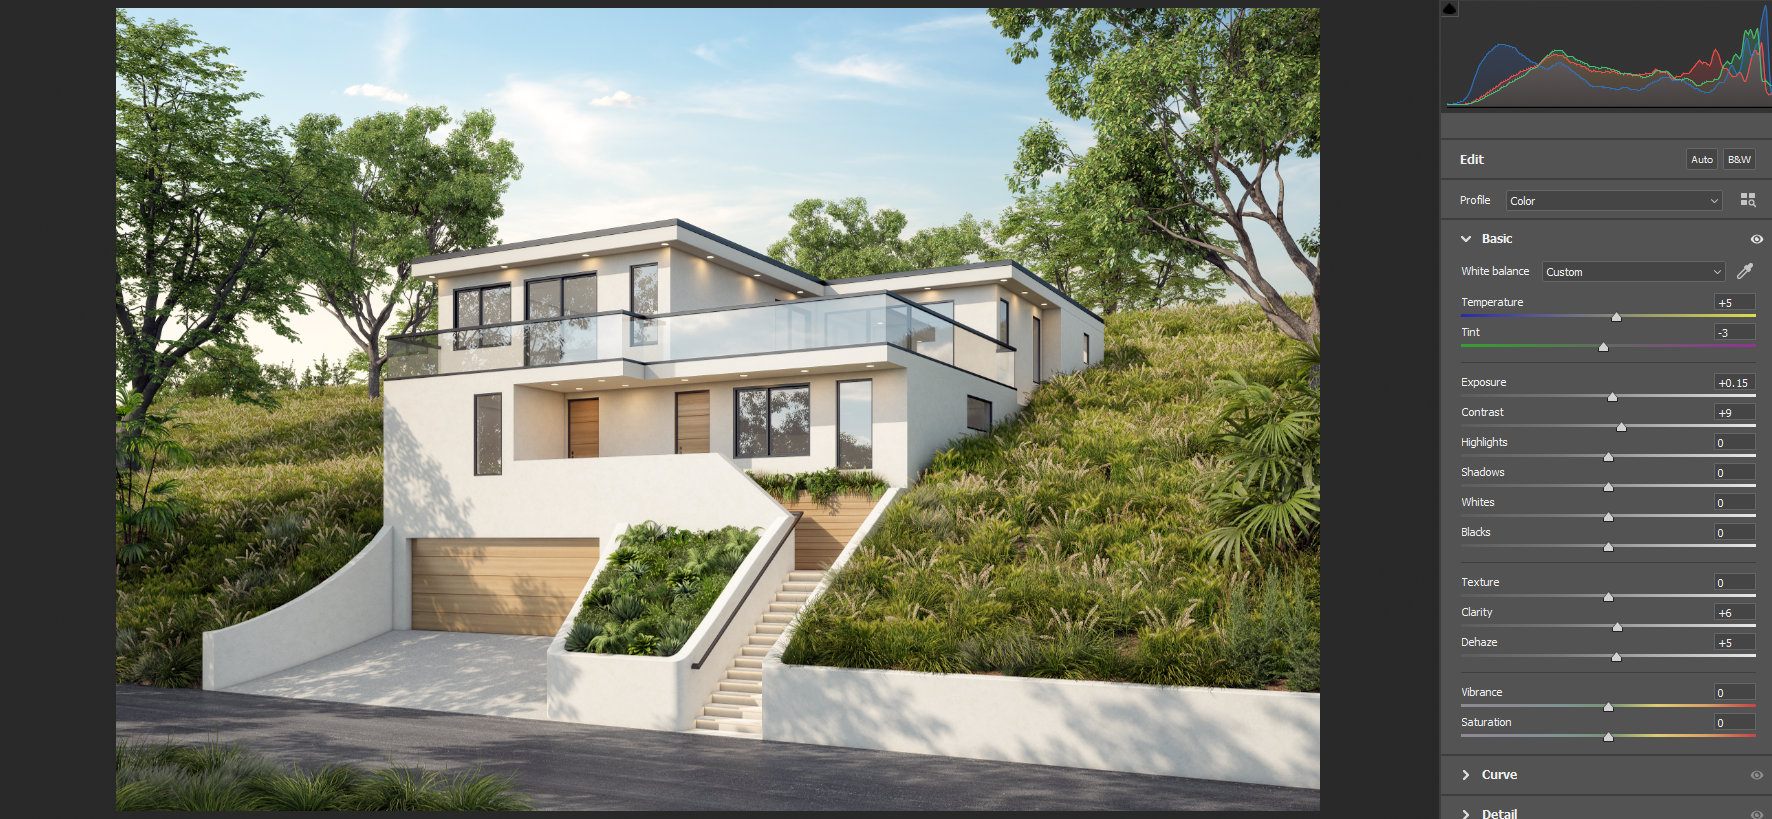
3. Use Camera Raw Filter for Global Adjustments
You don’t need to leave Photoshop to fine-tune exposure or color grading during post-processing. The Camera Raw Filter (found under Filter > Camera Raw Filter) is your best friend for quick, global edits.
Here’s what you can adjust:
-
Exposure & Contrast for balance
-
Temperature & Tint for warmth or coolness
-
Clarity to boost definition in textures
-
Dehaze to remove that digital flatness and add punch
All of this is non-destructive if you convert your layer to a Smart Object first. Fast, flexible, and surprisingly powerful.
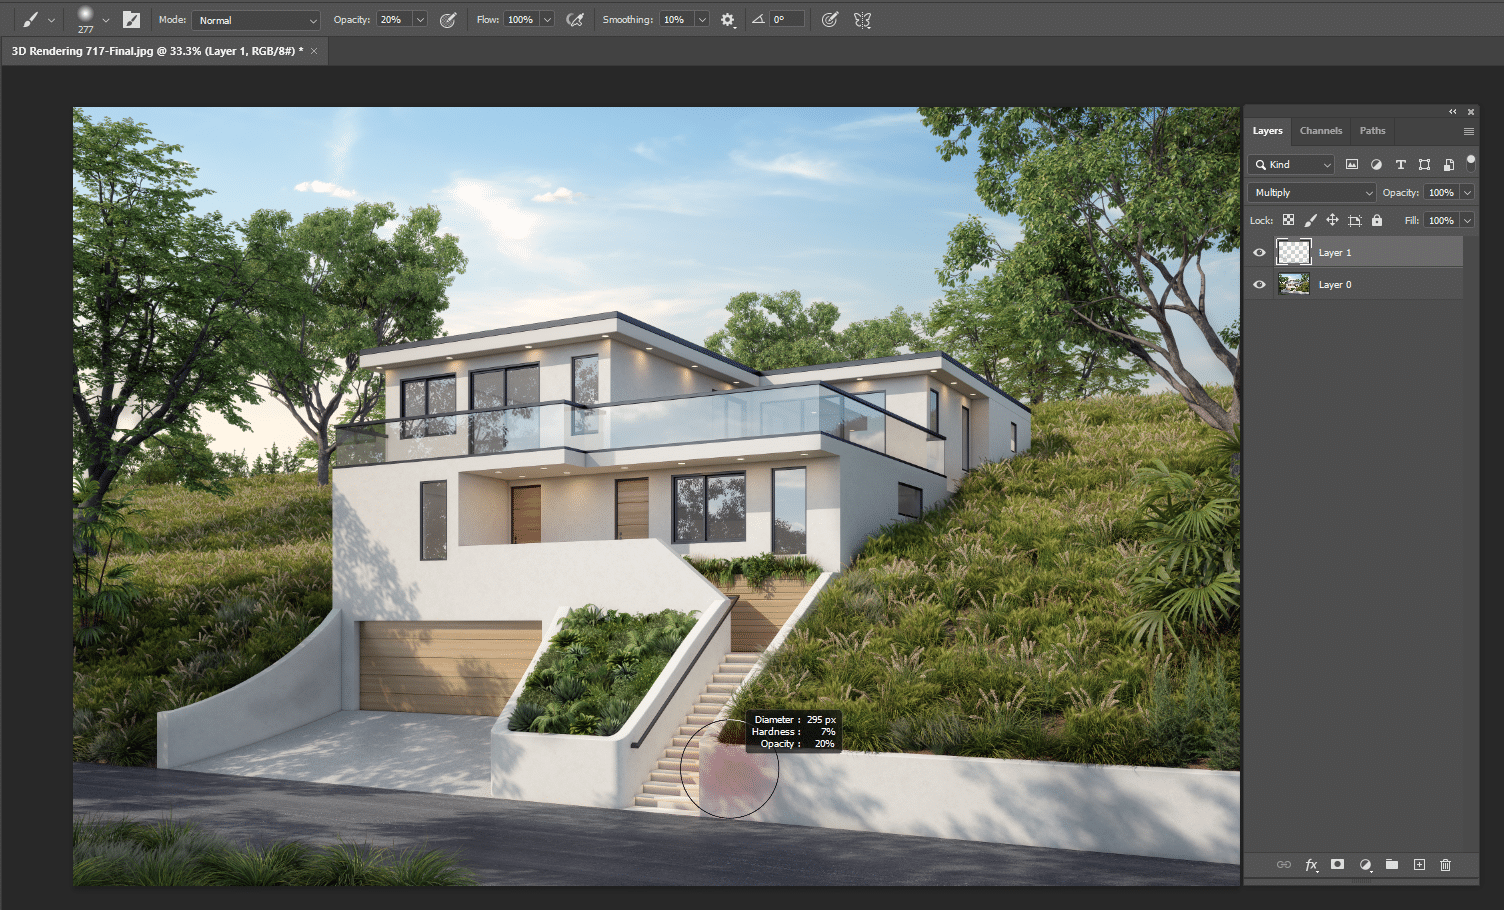
4. Enhance Shadows with a Painted Ambient Occlusion Layer
Didn’t export an AO pass? No problem. You can fake ambient occlusion directly in Photoshop during post-processing.
-
Create a new layer above your base render.
-
Set the blend mode to Multiply.
-
Use a soft round brush at 10–20% opacity, color black or dark brown.
-
Lightly paint in shadow corners, crevices, and areas where materials meet—under benches, roof edges, window frames, etc.
The result? Deeper shadows, more realism, and way more depth.
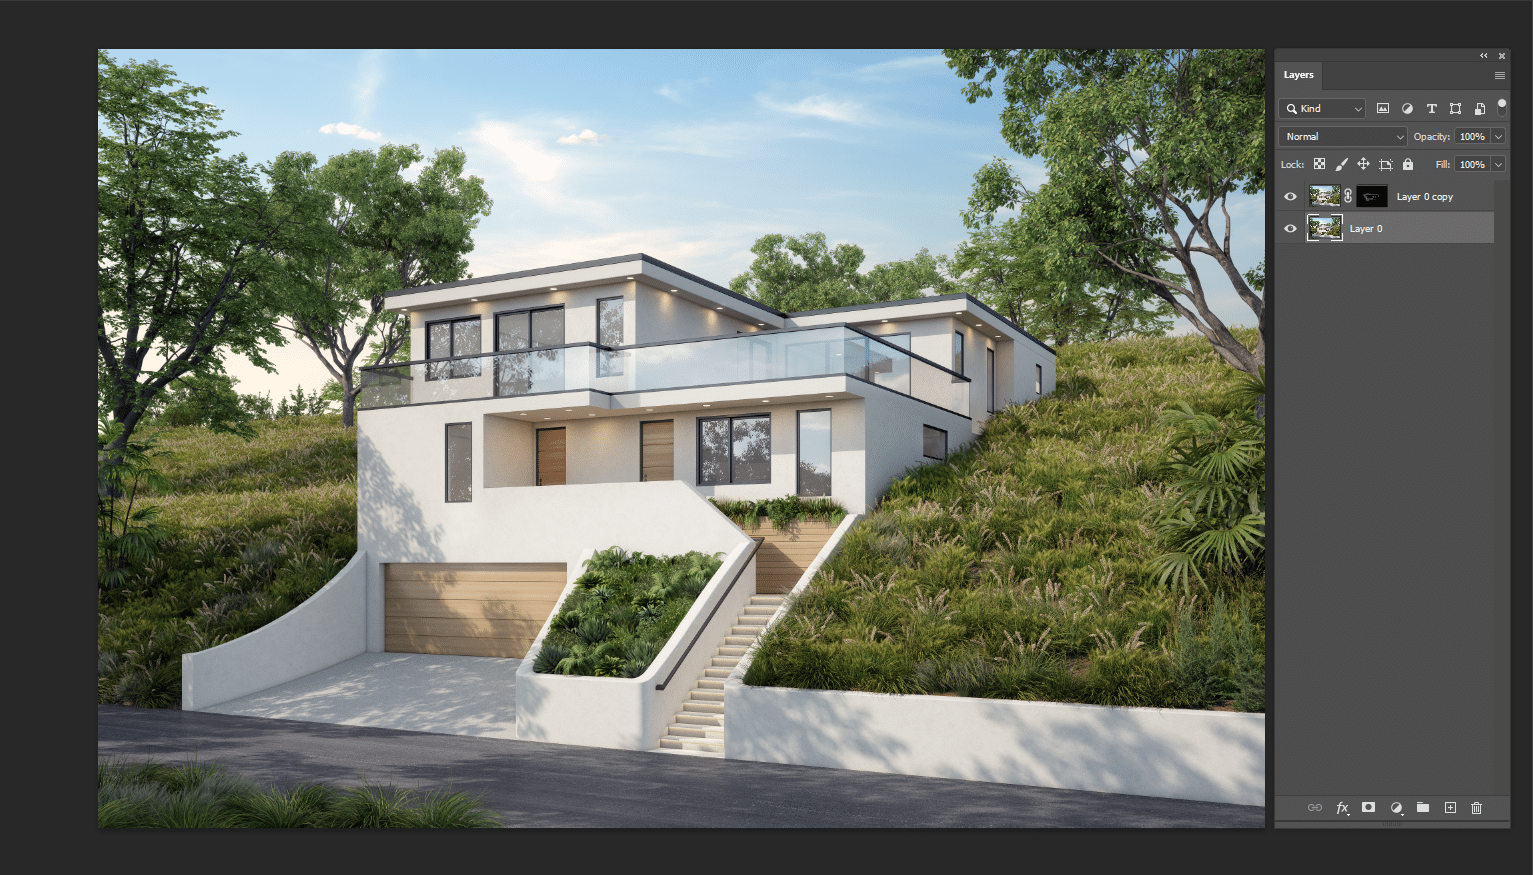
5. Control Reflections with Screen Layers and Layer Masks
Reflections too dull? Too shiny? Photoshop gives you total control.
-
Duplicate your main render layer.
- With the duplicated layer selected, go to
Image > Adjusments > Levels, Then:- Drag the black input slider to the right to remove shadow detail.
- Drag the white input slider to the left to boost bright spots.
- This will help isolate areas that naturally reflect light—like windows or shiny floors.
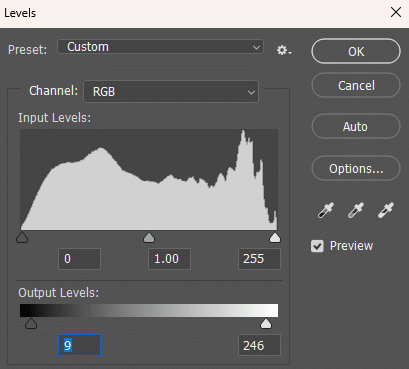
-
Click “OK” inside Levels panels and set the duplicate layer to Screen blending mode.
-
Add a layer mask and paint in only the areas where you want more shine—like glass windows, pools, or marble countertops.
Want to go further? Add a subtle Gaussian Blur to your reflection layer to simulate slight imperfections or condensation.
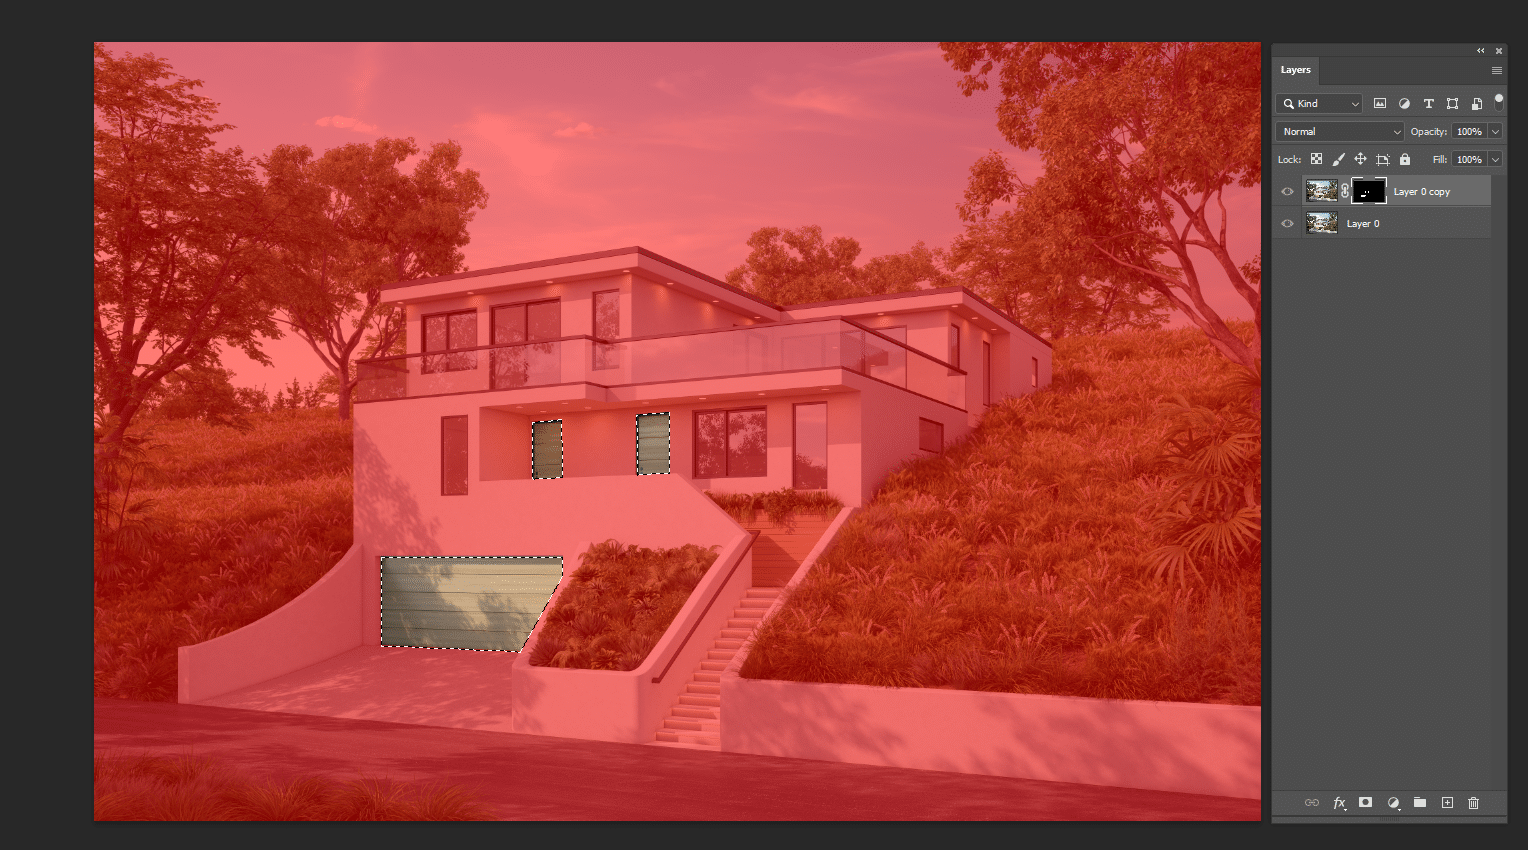
6. Make Local Edits Using Selections and Layer Masks
Photoshop’s selection tools are perfect for micro-edits. Whether you’re targeting specific materials or zones of the image:
-
Use the Lasso Tool, Quick Selection Tool, or Color Range to isolate areas.
-
Apply Curves, Hue/Saturation, or Exposure adjustment layers with masks to tweak color, brightness, or tone in specific spots.
Example: Want to warm up just the lighting on the living room floor? Select it and boost the warmth—without affecting the walls or ceiling.
Pro move: Feather your selections (2–5 px) to avoid harsh edges and make your edits seamless.
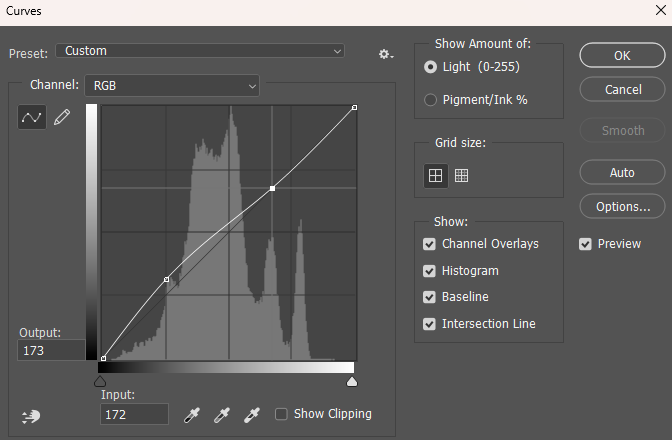
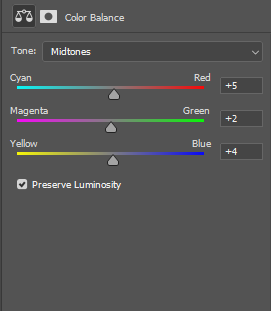
7. Color Grade with Curves, Levels, and Color Balance
Time to give your render a vibe. Whether you want a sunny LA afternoon or moody Scandinavian minimalism, color grading is key.
Photoshop tools to use:
-
Curves: Boost contrast and shape tonality.
Layer > New Adjustment Layer > Curves
-
Levels: Shift midtones for drama.
Layer > New Adjustment Layer > Levels

- Color Balance: Add warm highlights or cool shadows depending on the scene’s mood.
Layer > New Adjustment Layer > Color Balance
-
Gradient Maps (for the brave): Stylized looks with strong artistic impact.
Layer > New Adjustment Layer > Gradient Map

Think like a cinematographer: every color shift tells a story. Match your grading to the function and emotion of the space.
8. Add Glow and Lighting Effects Like a Pro
Lighting sells the render—and Photoshop can help you push it even further.
Try this technique:
-
Duplicate your base render layer.
-
Apply a Gaussian Blur (6–20 px depending on resolution).
-
Set that blurred layer to Screen or Soft Light mode.
-
Use a mask to apply the effect only where needed—like around pendant lights, windows, or sunlit areas.
You can also use the Gradient Tool to add soft light leaks or simulate “God rays” from windows. Instant drama. Just don’t overdo it—subtle is sexy.
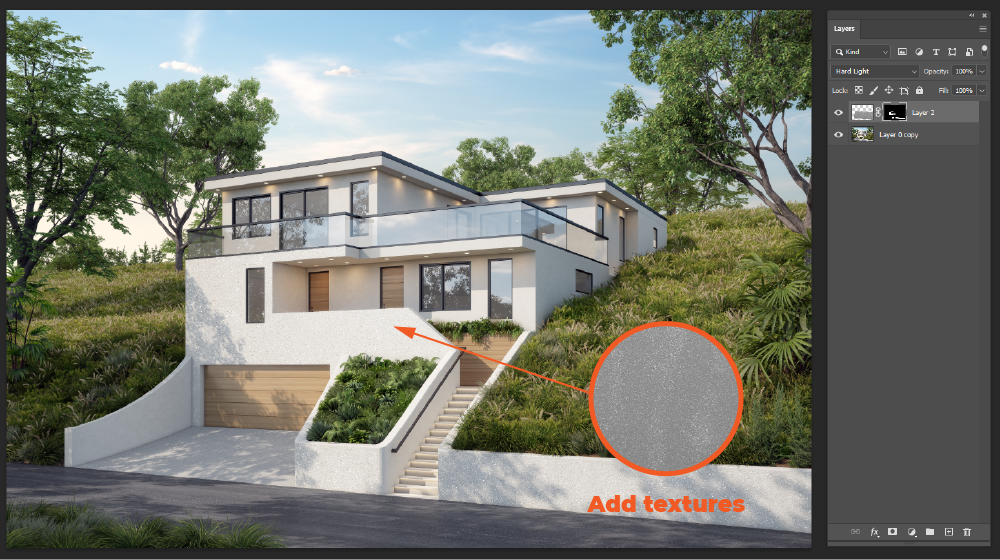
9. Overlay Imperfections for Real-World Texture
Nothing says realism like imperfection. In Photoshop, you can:
-
Add dust, grime, lens flares, smudges, or scratches using free textures (just search online “Grunge overlays, dust particles, scratched surfaces, concrete stains, lens dirt”).
-
Set these layers to Multiply or Overlay, then lower opacity to blend them naturally.
-
Use masks to apply them only where they make sense—like near drains, old walls, or industrial finishes.
You’re not dirtying your design—you’re telling a more believable story.
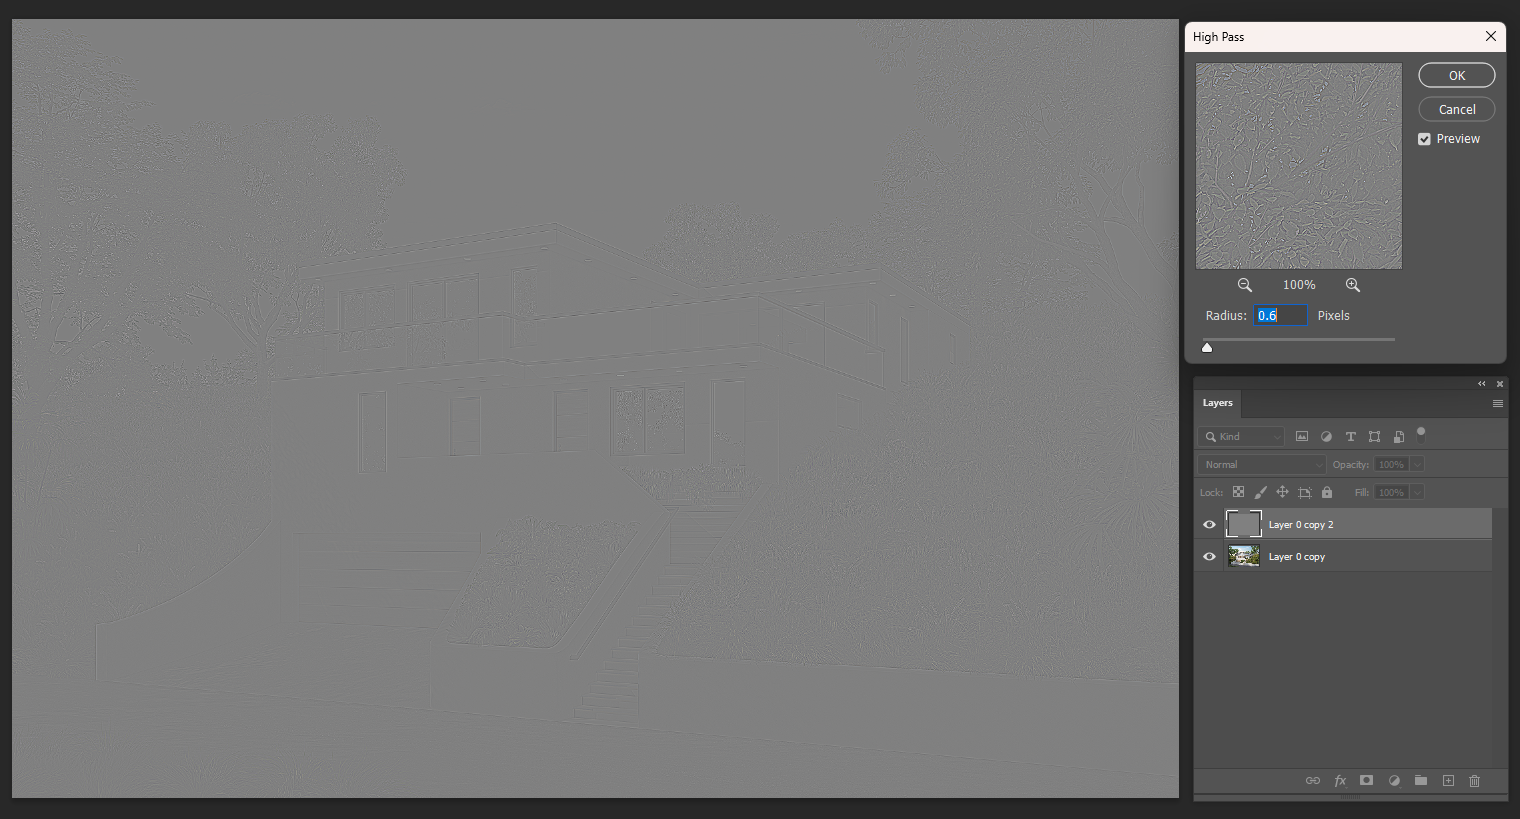
10. Sharpen with High Pass—Only Where It Counts
Detail matters—but only in the right places.
Here’s how to sharpen surgically in Photoshop:
-
Duplicate your final image.
-
Go to
Filter > Other > High Pass(start with radius 1–2 px). -
Set the layer to Overlay or Soft Light.
-
Add a black layer mask and paint in only where you want sharpness—edges, textures, facade materials.
Skip sharpening the sky or blurred background—it creates noise and breaks the illusion.
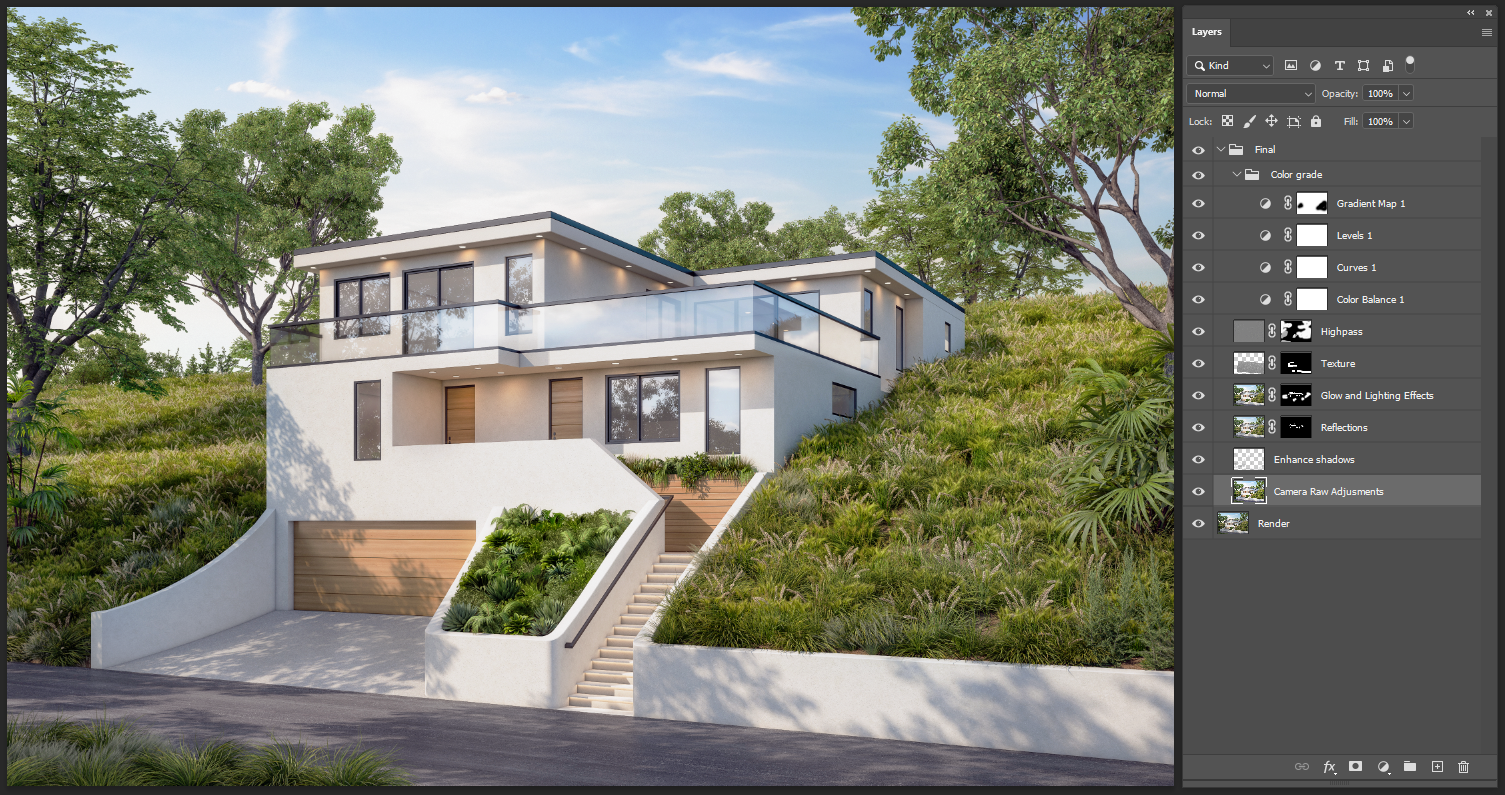
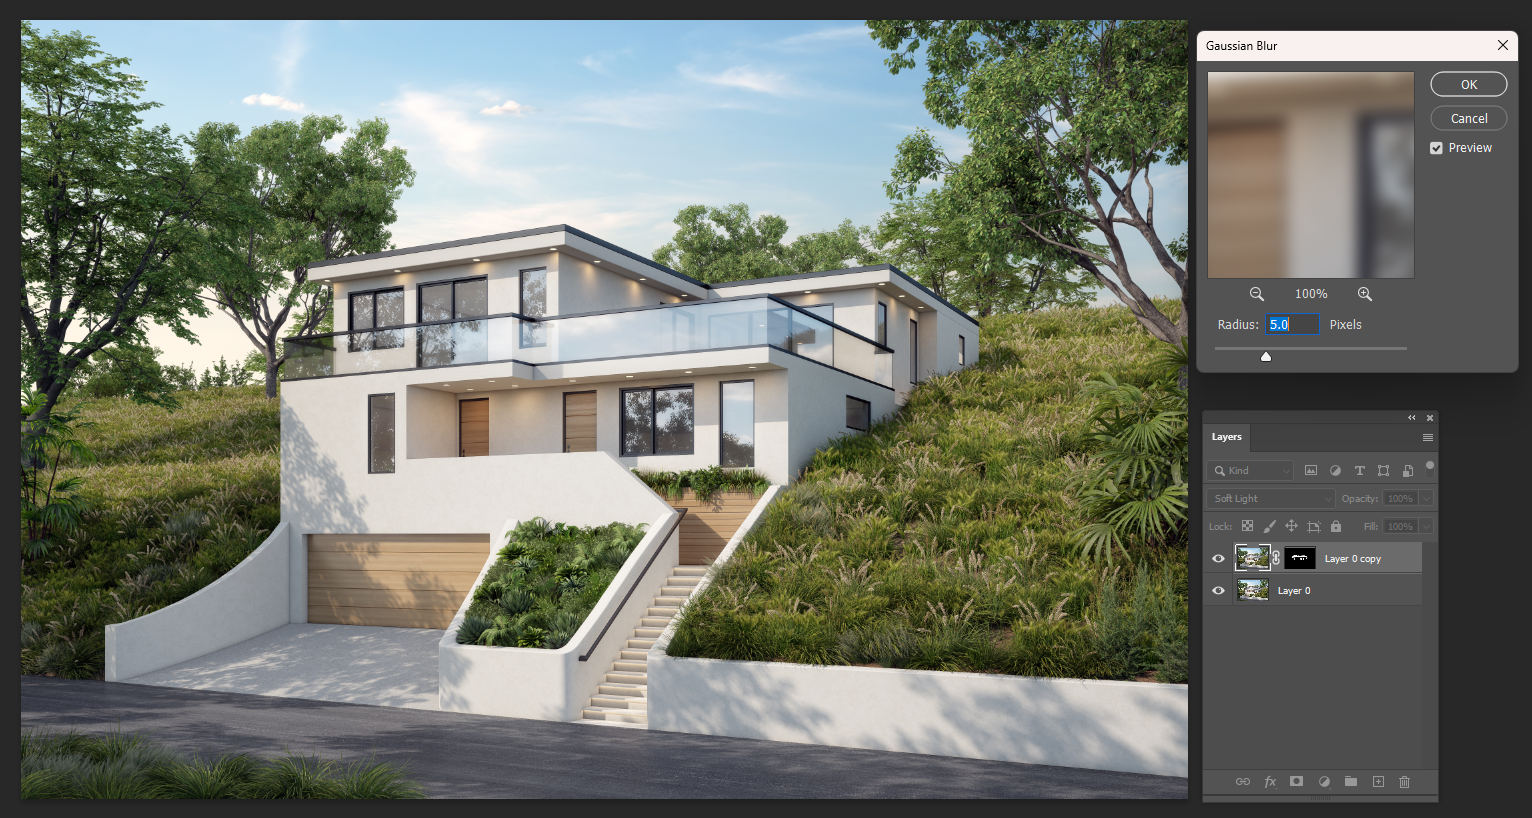
Post-Production Result Example from Xpress Rendering (Before & After)
Take a look at this rendering we recently completed at Xpress Rendering:
Before: A technically solid render that felt flat and sterile.

After: With a bit of post-processing magic (glow, AO, color grading, and sky replacement), the space came to life. Warm sunlight filtered through windows, materials had texture, and the whole mood shifted from “digital” to “desirable.”
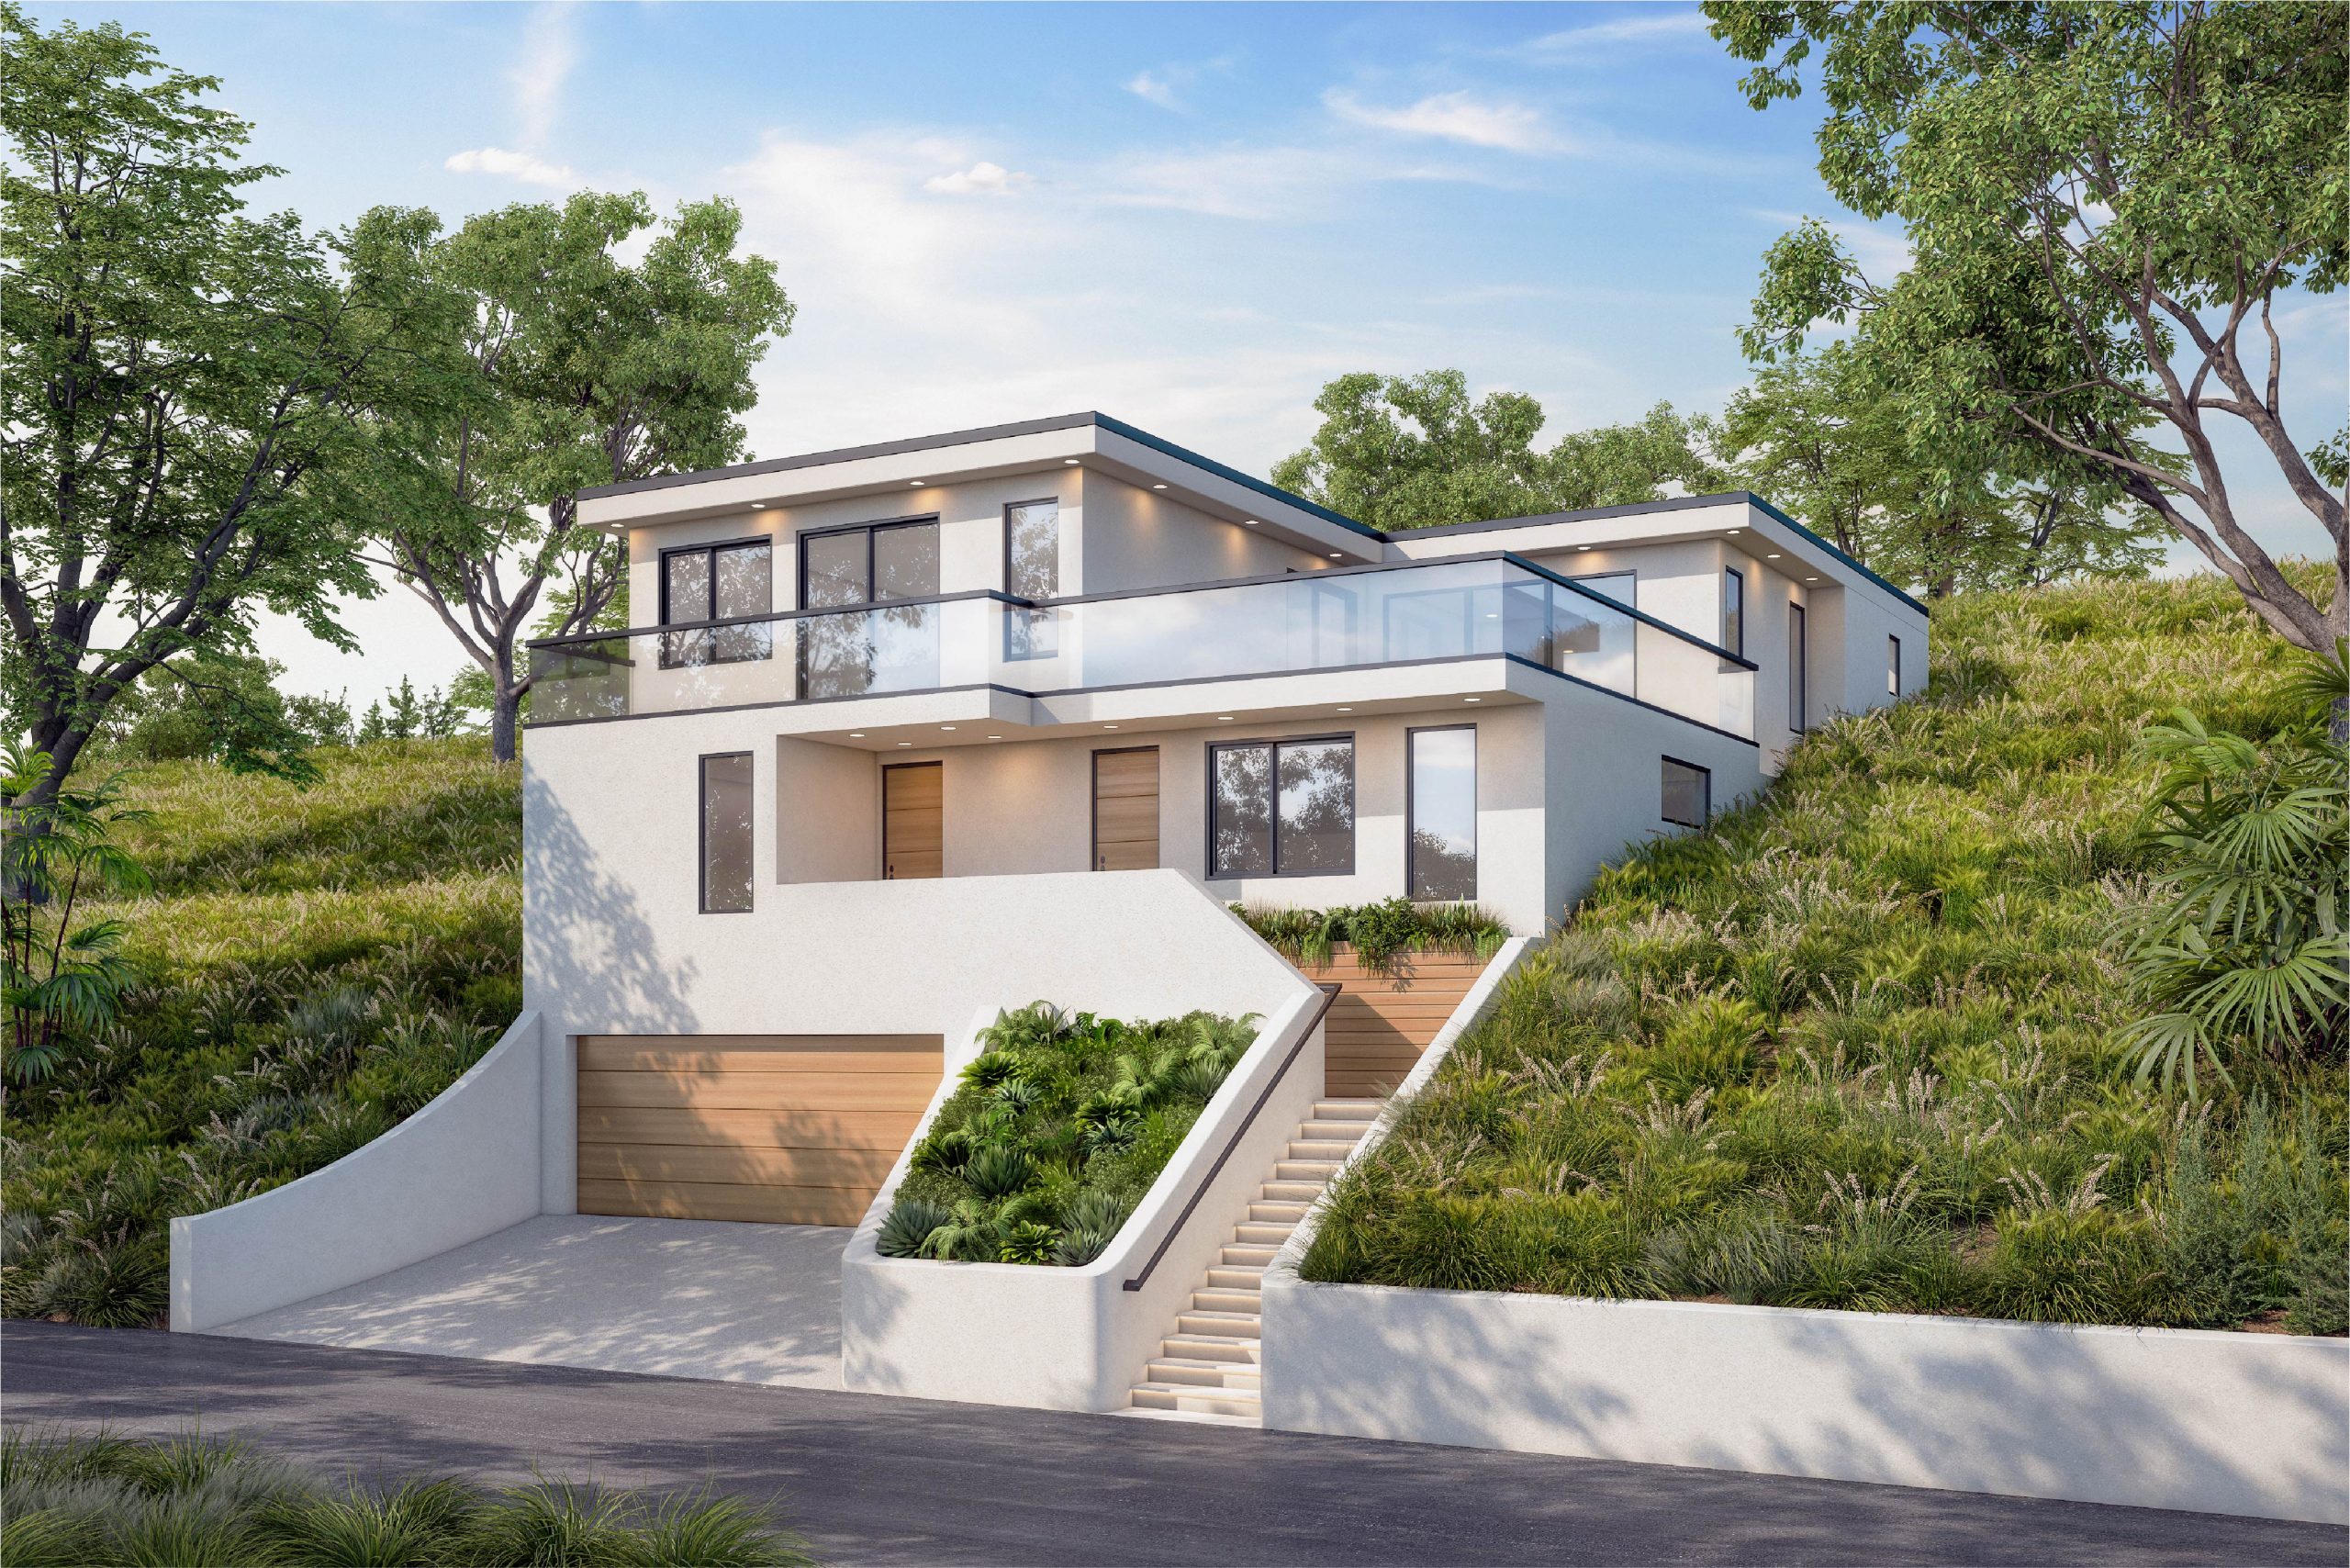
This is the kind of transformation that wins clients and elevates your portfolio.
Common Mistakes to Avoid in Post-Processing
-
Over-saturation and Unrealistic Colors
Your render shouldn’t look like it took a bath in Instagram filters. Avoid oversaturating materials or skies—subtlety sells.
-
Flattening the Image with Uniform Filters
Uniform color overlays or filters can remove depth. Always mask and work locally when possible.
-
Ignoring the Purpose of the Render (Client or Conceptual?)
Not all renders need the same treatment. A client pitch may call for realism, while a concept study might lean artistic. Let the intent guide your post.
Want to larn more about 3D renderings? “Download our free 3D Rendering Guide” and learn how 3D renderings can transform your presentations, speed up decision-making, and impress clients.
List of Best Post-Processing Softwares for Architectural 3D Renderings
- Adobe Photoshop – The gold standard for render editing.
- Lightroom – Great for quick batch editing or camera raw control.
- Affinity Photo – A solid budget alternative.
- After Effects – For video animations or cinematic effects.
- GIMP – Free and open source, if you’re feeling thrifty.
- Lumion Post FX – If you’re rendering directly in Lumion.
Final Thoughts About Post-Processing Tips for Architects
How and Why It’s Important to Build a Reusable Post-Processing Workflow
Post-processing doesn’t need to be reinvented each time. Build a PSD template with adjustment layers, masks, and effects you use frequently. You’ll speed up your process and maintain consistency across projects.
Save your favorite curves, LUTs, and gradient overlays. Use actions in Photoshop to automate repetitive tasks. Your future self will love you.
Want help creating stunning, client-ready 3D renderings?
At Xpress Rendering, we transform architectural ideas into visuals that sell, inspire, and engage. Whether you need a photorealistic rendering, a cinematic animation, or an interactive virtual tour, we’ve got your back.
Still reading? You’re officially a rendering rockstar. Now grab those render passes, launch Photoshop, and show the world what your design can really look like.
Let’s make your next render unforgettable.